Essay
Welcome back after our summer hiatus. As promised, this essay will cover a couple of post-processing techniques that will help you make your black and white photos look more appealing and dramatic than they would be by just clicking the “black and white” button on your editing software.
In review, always take your photos in color and use your post processing software to convert them into black and white. Don’t let your camera decide how to turn color into black and white. Your camera takes out all the color and turns it into shades of gray, and that really limits your post processing choices.
In your software, you should be able to turn your photo into a black and white picture. The tools I will be talking about will be used to enhance the dramatic qualities of your picture after it has been turned to black and white. In this lesson I will be covering two different functions of most post-processing software: gray scale balance and white balance. (Note: I use Adobe Bridge for most of my editing, so I will be using the functions from my software. You should be able to find the equivalent features in your software.)
 Gray Scale Balance
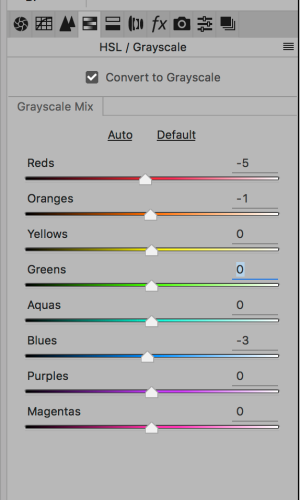
On my software, all I have to do is check the “Convert to Grayscale” box and my photo will instantly turn black and white.
If I click on “Auto”, it allows the software to pick what it wants as the amount of colors to be changed. I rarely use the auto function. Instead, I start to play with all the color sliders to see what a difference they make to the photo.
Now we can start to play with the color sliders. That might seem like a strange thing to do on a photo that you just changed into black and white, but remember that the color is still encoded in your photo’s file, so if you slide the red slider, all the reds in your photo will be darkened or lightened. It will show up in the finished photo in gray scale. I have some examples of how just moving one slider can dramatically affect your photo.
In this water lily, I am showing three different views: 1) the original color version, 2) the original black and white version and 3) the difference just one slider can make. (Click any photo to scroll through full sized photos and descriptions).
Here I changed the yellow slider:


And here is another example of the same flower where I changed the green slider:


Here is another photo and example of when I changed two color sliders. In this example I used orange and blue:


These are obviously extreme examples of what can be done with changing the actual strength of your original colors. I am not here to tell you what looks good or not. You are the creator of your own style and photographs. Play with the sliders. You will quickly learn what you like.
 White Balance
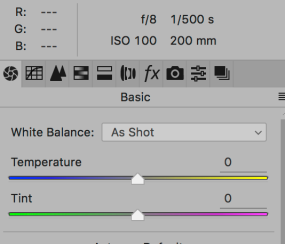
See the sliders for the Temperature to bring out cooling blue colors and warming yellow colors. As you slide towards the left, blue will be added. If you slide to the right, yellow will be added to your photo. Since you have already set your photo for black and white, you’ll see the changes in grayscale instead of in color. The changes won’t be nearly as dramatic as those shown above with the Gray Scale sliders.
The green and pink Tint sliders work in the same manner.
Here are some examples.
These sliders dramatically changed the red tones:


Changing the green isn’t quite as dramatic, but I think it brings out the texture slightly better.


In all these examples, you can mix and match your post editing techniques. I didn’t change anything in my original photos except for what I described here. I just wanted to let you know how much of a difference changing some of the colors can make in your black and white photos. All your other sliders and editing tools are still available to you.
Qi (energy) hugs
Cee


I love editing photographs, the colour, and lighting. It is amazing, the different effects a person can come up with. Great post, thank you!
LikeLike
So glad you liked this lesson. I had fun putting it together.
LikeLike
Here is something I came up with for this, Cee. Thanks for the lesson. https://alipatoblog.wordpress.com/2016/10/15/frosty-leaves/
LikeLike
The water lily is just beautiful. Your editing really brings out the detail.Hope I’m not too late getting this in!
https://norasphotos4u.wordpress.com/?p=1604&preview=true
LikeLike
Great read Cee. I use adobe lightroom and am aware of the technique your talking about here, however I didnt realise capturing an image in black and white limits the post production quality and editing parameters. Also I havent played around enough with the grayscale slidets, im usually satisfied with the effects of clarity and contrast however I will definitely give your tips a try!!
LikeLike
Thanks so much for commenting. Have fun playing around … and find what works for you.
LikeLiked by 1 person
It has taken me all day to put something together for this, reminding me why I usually don’t enter. I don’t know if it’s particularly good, but I tried. it will be up on Friday. I still have some “tweaking” to do. You seem to know what you do when you are processing. I just do stuff until I like it, which makes it really hard to remember.
LikeLike
I look forward to your post Marilyn. Tweaking is always fun. I don’t do that as much as I used to. 😀 Or maybe I just now know what I am doing. Who knows.
LikeLike
https://learawrites.wordpress.com/2016/10/01/cees-compose-yourself-lesson-24-black-and-white-post-editing/
LikeLike
This is a good lesson, Cee. I learned something. Thank you.
I don’t know why… when I select “Red”, it seems like the other colors (in black and white) have changed too. Maybe I should try other software. ;-(
Good night.
LikeLike
Thanks Helen for commenting. Hope you got a great nights sleep.
LikeLiked by 1 person
Thanks for the lesson. I hope you are not expecting too much explanation with the photos – I played around, saved what I liked and started again from scratch. I never remember which slider or button I used except for the ones that I use almost constantly (I always play around with contrast and light conditions).
Your flower is particularly “enlightening”.
LikeLike
I don’t expect you to see you any more wordier than I was. All I really need to see is the photos before and after. 😀 Glad you like the flower.
LikeLiked by 1 person
This is right up my alley! Thanks, Cee.
LikeLike
A great explanation as usual… I never dared to touch any of these sliders because I wasn’t sure what they were for. 🙂 I really liked the picture of the flower with the light yellow slider!
LikeLike
You can always undo a slider change. Play with your software. If you are unsure, copy your photo then play with all the sliders and buttons so you don’t harm your original photo.
LikeLiked by 1 person
I will have a bash, probably means Bob will sneak into the photo.
LikeLike
Have fun.
LikeLike
Reblogged this on On the Road Cooking and commented:
Great tutorial!
LikeLike
Oh , this is so my chair. 🙂
LikeLike
It is a cool chair!! 😀
LikeLike
I learned something, thank you! What editing software do you use? I’ve been playing around with Corel Paintshop as of late, I will have to try some of these techniques 🙂
LikeLike
Corel Printshop is a good program for post editing. I don’t know it myself, but the reviews are great.
LikeLiked by 1 person